VIDEO
CONTENT
QUIZ
MATERIALS
Anatomy
Patient Positioning
Supportive Measures
Preparation
Access Techniques
Closure
Surgical Intruments
Sutures and Suture Material
Drainage
Wound Healing
Wound Healing Complications
Re-laparotomy
Gloves
Anatomy of the Abdominal Cavity and Organs
- Enclosure and Boundaries
- Vertically enclosed by the vertebral column and abdominal muscles.
- Upper boundary: Diaphragm, separates from chest cavity.
- Lower boundary: Upper plane of the pelvic cavity.
- Organs within the Abdominal Cavity
- Digestive tract organs: Stomach, small intestine (jejunum and ileum), large intestine (colon).
- Other organs: Liver, gallbladder, spleen, pancreas.
- Kidneys and adrenal glands: Located above the kidneys.
- The Peritoneum
- Lining: Peritoneum lines the abdominal cavity wall (parietal peritoneum) and organs (visceral peritoneum).
- Peritoneal cavity: Space between the two peritoneum layers, contains serous fluid.
- Function: Supports and fixes abdominal organs in place.
- Compartments: Created by diverse peritoneum attachments.
- Organ attachments: Pancreas and liver attached via peritoneum areas and ligaments.
- Linea Alba and Midline Incision
- Linea Alba: Dense collagenous band along the abdominal wall’s ventral midline.
- Location: Extends from xiphoid process to prepubic tendon.
- Midline Incision: Also known as laparotomy or celiotomy.
- Process: Incision along linea alba for minimal vascular and nerve damage.
- Steps: Skin incision, division of subcutaneous fat, linea alba, and peritoneum, then intra-abdominal intervention and closure.
Structure of the Anterolateral Abdominal Wall
- Overview
- The abdominal wall is critical for protection and movement.
- Divided into anterolateral and posterior sections.
- The anterolateral wall is most relevant for most surgical interventions.
- Skin
- Outermost layer of the anterior abdominal wall.
- May show stretch marks in cases of pregnancy, obesity, or distention.
- Subcutaneous Tissue
- Just beneath the skin, consisting of connective tissue.
- Subdivided into two layers:
- Camper’s Fascia: Superficial fatty layer.
- Scarpa’s Fascia: Deeper membranous layer.
- Abdominal Muscles and Associated Structures
- Four main paired symmetrical muscles constitute this layer:
- External Oblique Muscle: Outermost muscle layer.
- Internal Oblique Muscle: Lies under the external oblique.
- Transversus Abdominis Muscle: Deepest of the flat abdominal muscles.
- Rectus Abdominis Muscle: Strap-like muscles along the front.
- Investing fascia and aponeuroses: Connective tissues enveloping the muscles.
- Four main paired symmetrical muscles constitute this layer:
- Transversalis Fascia
- Thin layer lying deep to the transversus abdominis muscle.
- Acts as an additional barrier before reaching the peritoneum.
- Parietal Peritoneum
- Deepest layer of the abdominal wall.
- Lines the abdominal cavity itself.
Positioning of the Patient for Laparotomy
- Main Objective
- The primary goal of positioning is to provide a clear and facilitated exposure of the operative field.
- Elevate deep, hard-to-reach operative areas.
- Keep organs adjacent to the operative site at a distance.
- Securing the Patient
- Ensure secure, non-traumatizing fastening of the anesthetized patient on the operating table.
- Fixation must allow for multiple intraoperative repositionings of the patient in vertical, horizontal, and sagittal directions.
- Eliminate any localized pressure on exposed body parts of the abdomen and limbs.
- All potential intraoperative position changes should be checked preoperatively.
- Preventing Positioning Injuries
- Soft, wide-area padding can reliably prevent such injuries.
- Risks are minimized using rubber and foam cushions, air bladders, and soft cloths.
- Patients with chronic arterial circulation issues are especially at risk.
- Note
- The surgeon is responsible for the correct positioning of the patient.
- Modern Operating Tables
- Enable optimal patient positioning, intraoperative X-ray and fluoroscopy control, good corrosion-proof disinfection, and high operational reliability.
- Suitable portioned anatomical adaptation and seamless transition between applying and releasing tension in the operative field are possible with electro-hydraulically divided table plates.
- Common operating tables today allow for adjusting the height and repositioning of the patient in all desired directions from a single control panel at the head of the table.
- However, positioning must always consider the patient’s circulatory situation. For instance, with the upper body elevated, the legs must also be elevated to prevent blood from pooling in the lower half of the body.
- Before draping, attach electrodes for thermal or electrocauterization to the patient.
- Standard Patient Positioning
- The normal position for the patient is horizontal (Figure 1-6a).
- The patient lies on their back with their head tilted backward for easy access by the anesthetist and legs stretched out.
- Legs are secured above and below the knees with wide, soft straps.
- Arms should be extended out at an 80° angle on both sides of the body, allowing the anesthetist to access venous and arterial lines for infusion therapy and intraoperative monitoring.
- Extending the arms and securing them in cushioned holders with sterilizable straps facilitates necessary repositioning and prevents patient slippage.
- Upper Abdomen Operations
- With the upper body elevated, gravity causes the small intestine to fall away, not obstructing the surgery (Figure 1-6b).
- The operative field can be elevated by sliding a continuously inflatable rubber cushion under the patient, which conforms to the body’s shape and reliably avoids pressure injuries.
- To close the wound without tension, the air from the cushion is released.
- Lower Abdomen Operations
- For procedures in the lower abdomen, the Trendelenburg position, with the head down, allows the small intestine to fall back into the upper abdomen (Figure 1-6c).
- Complex Abdomens
- For difficult cases with adhesions, where the bowels are stuck to the anterior and lateral abdominal wall, hyperextending the patient can significantly ease the operation.
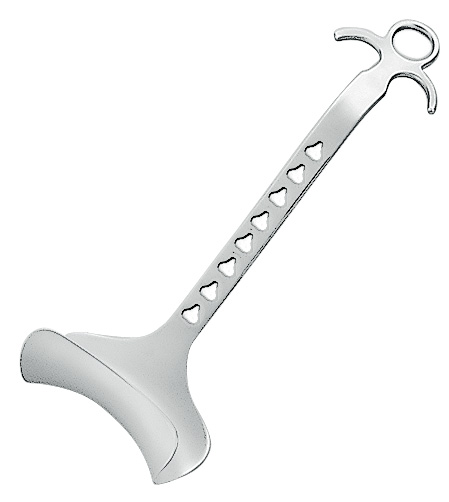
Rochard Wound Hook
A surgical instrument designed for retracting and holding back the edges of a wound or surgical incision, facilitating visibility and access to the operative area. It features a handle and a hooked end, which can be placed in the edge of the tissue to maintain tension and exposure during procedures.
Self-Retaining Retractors
- Introduction to Self-Retaining Retractors
- Essential for maintaining an open surgical fieldImproves visibility and accessPotentially reduces the need for an additional assistant
- Application in Limited Surgical Fields
- Ideal for small or confined operation sites
- Enhances surgical oversight
- Can be critical in intricate procedures
Surgical Site Preparation for Laparotomy
- Preparation of the Abdominal Area
- Shaving from nipples to below the pubic symphysisAvoiding pre-surgical day shaving to reduce infection riskAvoiding hair removal creams due to potential irritation and allergies
- Urinary Catheterization
- Preference for suprapubic catheter over urethral in men
- Cystofix® as a suggested catheter
- Can be inserted pre- or intraoperatively
- Intraoperative Suprapubic Bladder Puncture
- Checking for clotting disorders and ensuring a full bladder
- Incision and puncture techniques
- Care to avoid injuring the epigastric arteries
- Desinfection and Draping
- Using 96% alcohol and non-allergenic antiseptic solutions
- Desinfection process from sterile to unsterile areas
- Importance of dry surfaces to prevent electrocautery burns
- Self-Adjustable Surgical Lighting
- The importance of sterile-handling surgical lights
- Reducing dependence on support staff
- Positioning of the Surgical Team
- The arrangement of surgeon, assistants, and nurses varies
- Common practice of the surgeon operating without an assistant on one side
Scalpels

Small, sharp instruments with a blade used for making incisions in the skin or other tissue during surgery.
Lexer Scissors

Lexer scissors are essential general surgery scissors with slightly rounded, often blunt-tipped blades.
Metzenbaum scissors

The Metzenbaum scissors are dissecting scissors suited for preparing various types of tissue, thanks to their blunt blades.